Search
How do I install the license server for floating licenses?
This article is about using the floating license server as a common application. If you prefer to run the floating license server as a ‘service’, please check the following article: Can I run the floating license server as a service? This article applies to Exostiv license server (software environment v2 ‘dark’).
This article is about FLOATING licenses only!. To know how to activate a node-locked license, please go to the following article: ‘How do I activate my node-locked license’
A floating license server holds a pool of licenses for a piece of software and hands them out on demand rather than tying a license permanently to one machine. When a client application starts, it requests a license “lease” from the server over the network; if a license is available in the pool, the server grants it and the client can run for the duration of the lease (or until it closes the application), at which point the license is returned to the pool for another client to use. This lets an organization buy, say, 20 licenses and share them across 100 installed machines, since usage is rarely simultaneous.
This artricle shows how to:
- Install the floating license server
- Activate the floating license in the floating license server
- Set the floating license server parameters so it is ready to lease the licenses
- Set up the user client application so they can lease licenses from the floating license server.
STEP 1: Install the floating license server application.
The floating license server application is included in the Exostiv software installation package. Go to the page that corresponds to your software and download the version that corresponds to your server OS. Please note: you can installe the license server on a Linux machine and have user client machines using another OS (like Windows).
! The floating license server is common to Exostiv Probe and Exostiv Blade. If you use Probes and Blade, it is possible to only install one instance of the license server. !
Unpack and install the downloaded software.
What is ‘license activation’?
For the license server to be able to lease a license, the license that you purchased with your Exostiv Labs product must first be ‘activated’. Activating the license uses the license key that you received at the purchase. If you have not received a license key, please contact us. Once activate, the license is ‘installed on your license server’. For instance, the license key contains the number of license seats for use with each of our products and can contain specific options (like optional software). Making sure everything is properly installed on the license server actually allows you use our products.
STEP 2: Activating your license
Check the following: is the machine where you install the license server connected to the Internet? If so, you can proceed with a ONLINE LICENSE ACTIVATION. If not: jump to OFFLINE LICENSE ACTIVATION.
Online activation is the most flexible option as moficiation to your licenses can be applied instantly. With offline activation, you’ll have to interact with someone from Exostiv Labs’ staff.
Online floating license activation
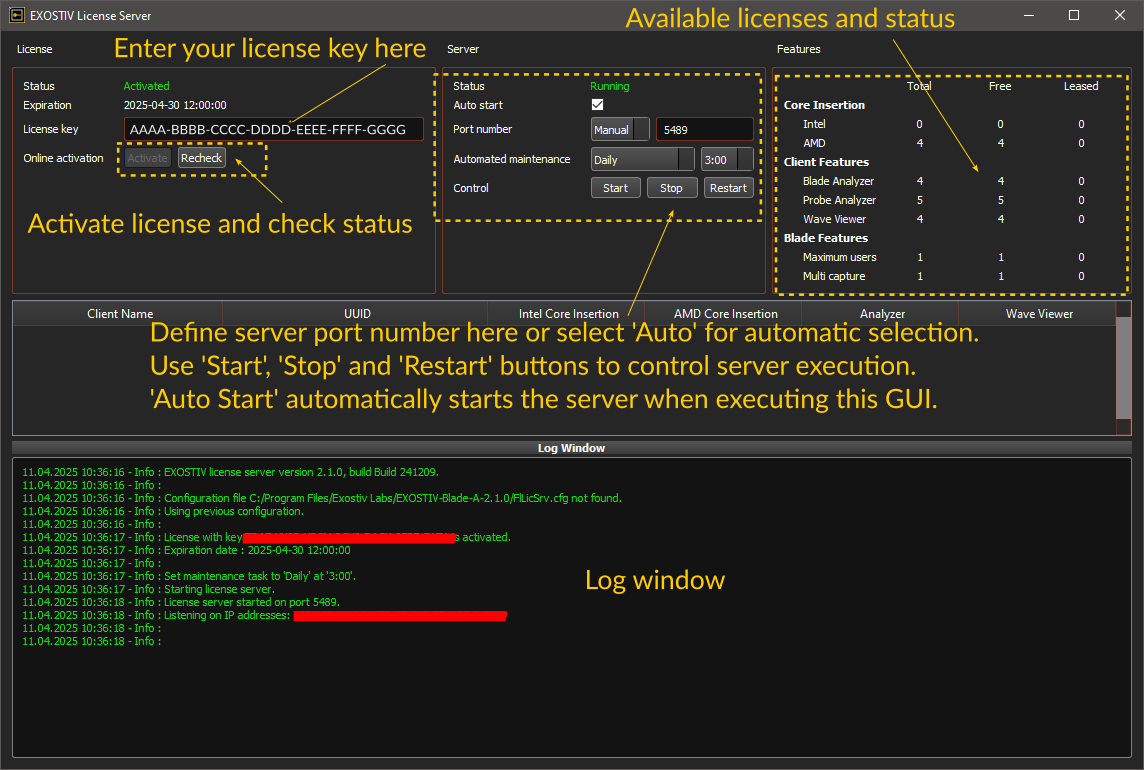
Start the floating license server application. The executable name is ‘ExoLicSrv’. At opening, the Exostiv license server window opens. The license is not activated and the license server is not running.
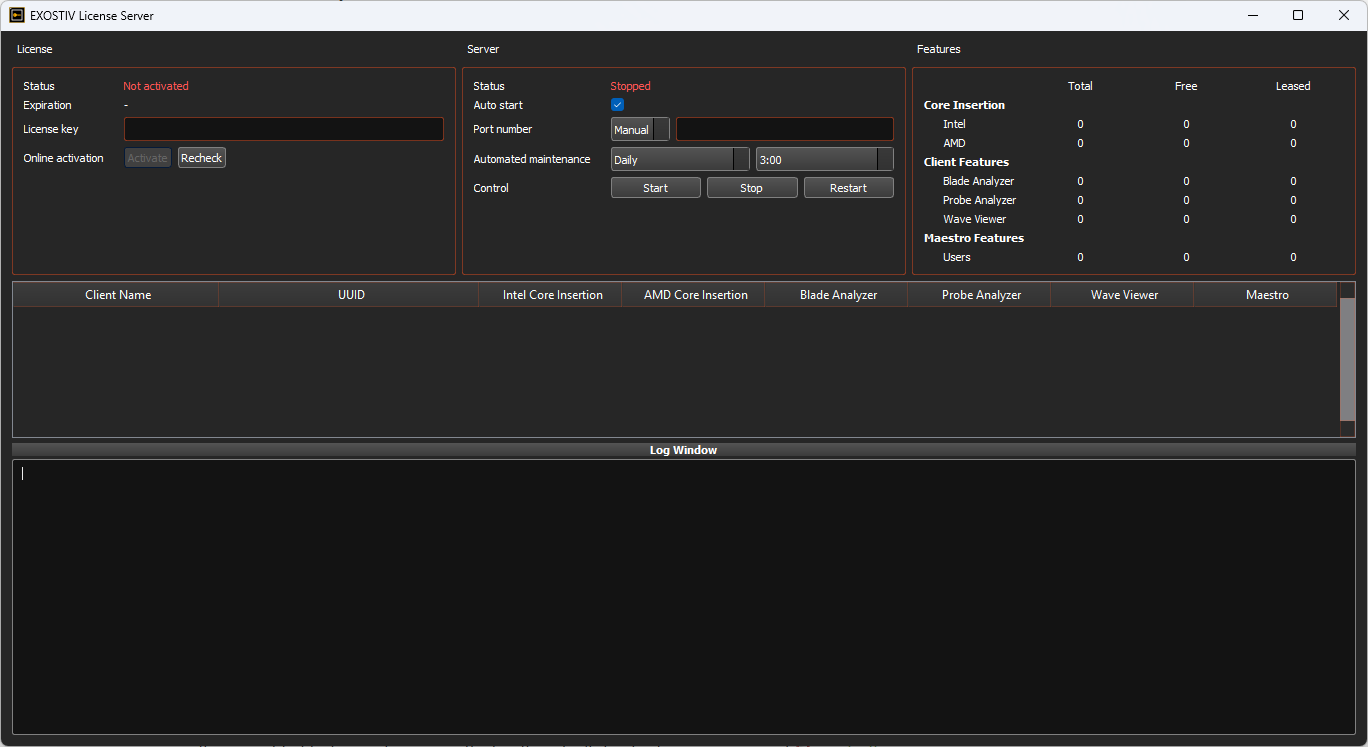
- Enter your license key into the ‘license key dialog’.
- Click on ‘Activate’.
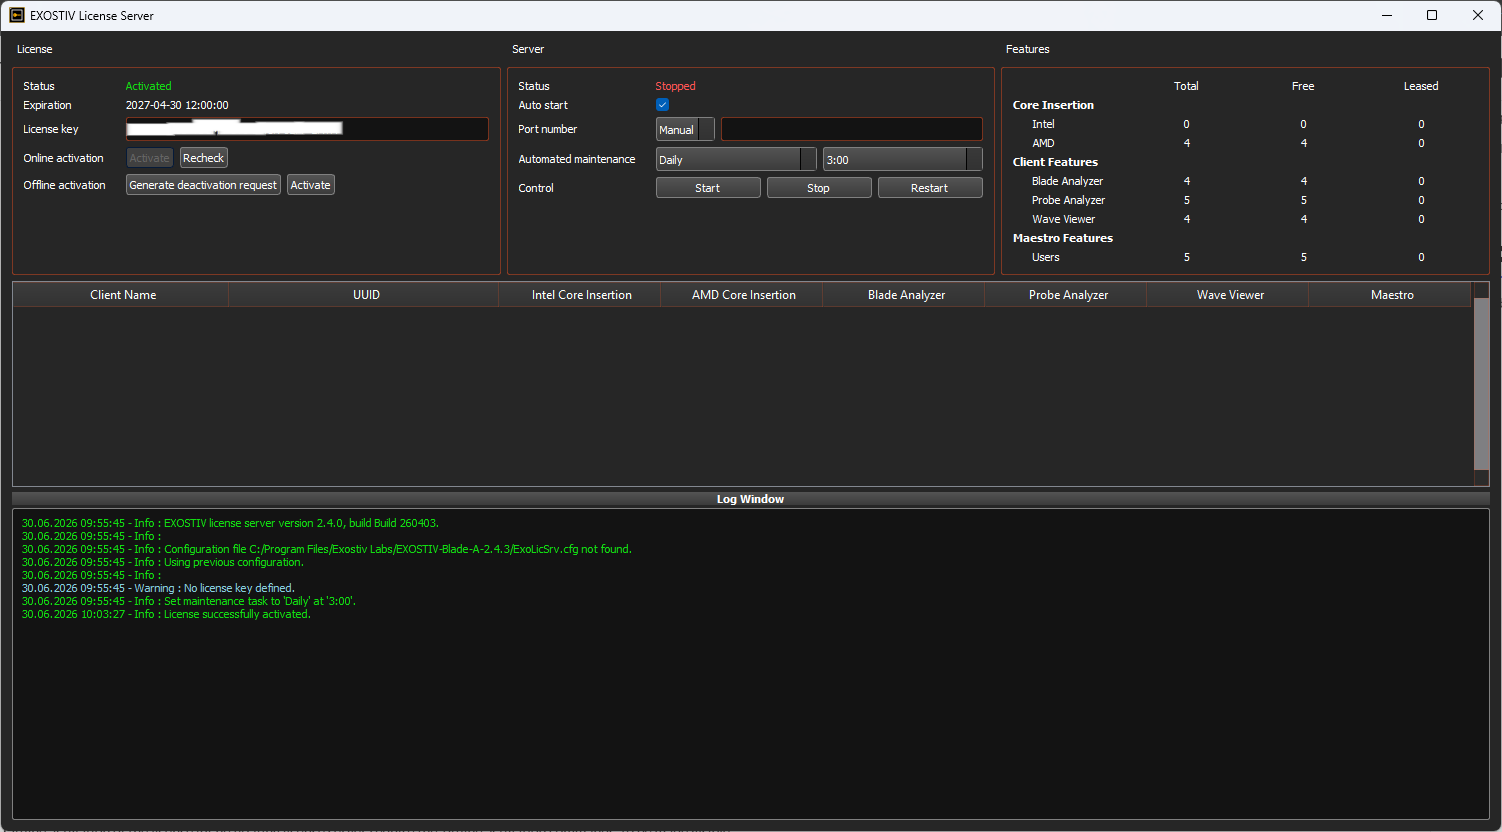
That’s it. The license is active.

Offline floating license activation
For faster service, please always prefer online activation when possible.
Offline activation of the license int he floating license server require the ‘offline activation commands’ to be made visible.
To do this, proceed as follows:
– Download and save the following file: offline_activation
– Copy this file in the same directory as the Exostiv license server executable (ExoLicSrv).
– Or create a file named ‘offline_activation’ (no extension) at the same level as the Exostiv license server executable (ExoLicSrv).
Start the floating license server application. The executable name is ‘ExoLicSrv’. At opening, the Exostiv license server window opens. The license is not activated and the license server is not running.
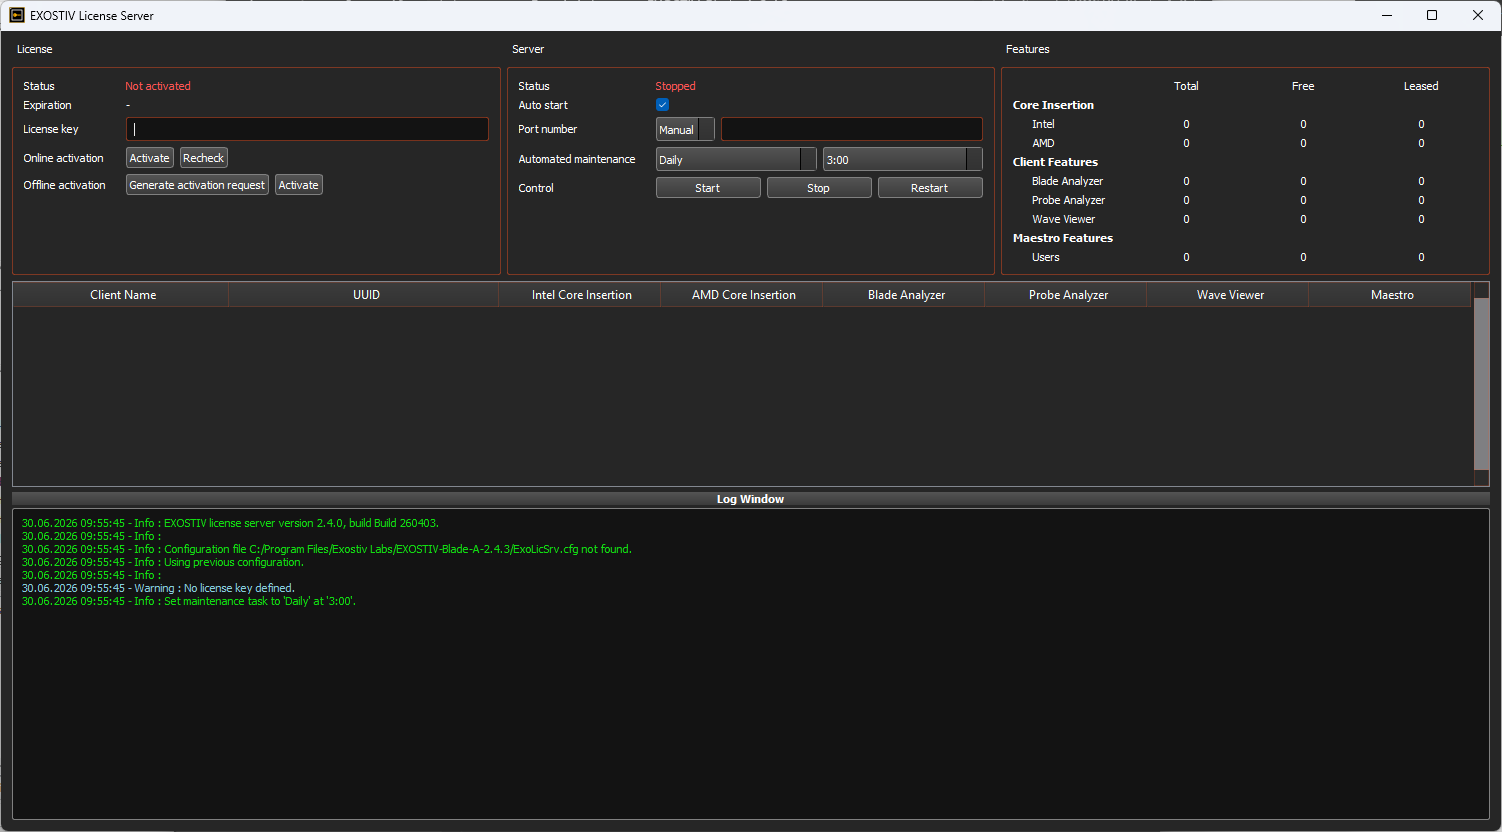
The license server application has checked for the presence of the ‘offline_activation’ file and now there are distinct ‘online’ and ‘offline’ activation controls.
- Enter your license key into the ‘license key dialog’.
- Click on ‘Generate activation request’. This generates a .xml activation request file (default name: ‘ActivationRequest.xml’). Save it.
- Send the ActivationRequest.xml file to us.
- We will generate a send you an ‘Activation Response’ file back (default name: ‘ActivationResponse.xml’). Save it.
- In the Exostiv License server, click on ‘Activate’ ! Use the activate button located next to the offline activation controls ! Don’t use the Activate button use for Online activation’. This opens a dialog from which you need to point to the Activation Response we just sent.
That’s it. The license is active.
STEP 3: Set up and start the license server
Now that the license was activated, you have to set up the server so it can lease (‘serve’) the available license seats.
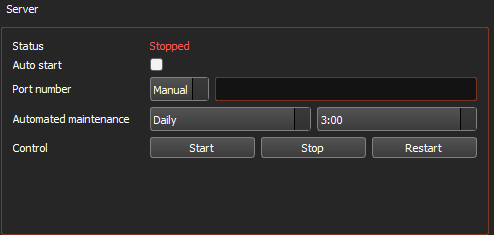
- Define the ‘port number’. This can be any available port on the server machine. It must be open and visible for the users wishing to lease a license from this license server. Set the drop down top ‘Manual’ and define the port number (example: 5678). Alternatively, you can set the port number dialog to ‘Auto’ and a port number will be selected automatically.
- Keep the port number: this parameter will have to be communicated to any of the users wanting to lease a license.
- Start the license server: hit on the ‘start’ button.
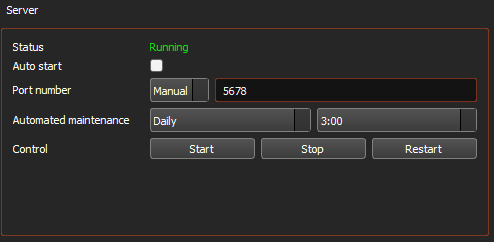
That’s it, your license server is up and running and ready to lease licenses.
Summary and additional controls
STEP 4: Set up the client application to lease the license from the license server.
The following instructions happen on the user’s client machines. The client applications using a floating license must point to the license server so they can lease (‘borrow’) and license from it.
The ‘client applications’ can be:
- Exostiv Core insterter
- Exostiv Probe client
- Exostiv Blade client
- Exostiv Maestro
- …
PREREQUISITES: A license server should be installed and started first – see above. It must be running. This license server and prot must be ‘seen’ from the machines where the Client Applications are installed. Strict firewall rules can prevent this. Check with your IT adminstrator.
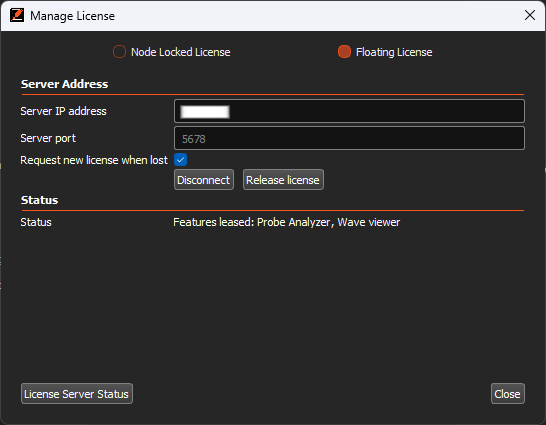
If this set up was not previously done, the ‘Manage license’ window prompt should open automatically at first start up. To open it manually, click on ‘Help > Manage license’.
IMPORTANT : From this window, select ‘Floating License’ Radio button from the top.
- Specify the license server IP address – that is the network IP address of the server where the floating license server was installed.
- Specify the chosen port defined in the floating license server
- Click on ‘Connect’.
If a valid license is available from the server, it will be ‘leased’. This license will be released after you exit the application.
That’s it, you have completed the floating license server and the client floating license lease set up.