Did you know that Exostiv can send triggers across clock domains?
‘Visibility into the FPGA’ is a multi-dimensional notion. Obviously, it means ‘being able to watch’ the inner workings of the chip – and hence, acquire the broadest (over)view on the FPGA. Today, we’ll cover another aspect – this of being able to navigate through the complexity of a FPGA design to narrow down to a specific event. Think about finding a bug and being able to roll back to its cause, for instance. In a FPGA, it really requires hopping from one location of the chip to another and specifically, from a clock domain to another one.
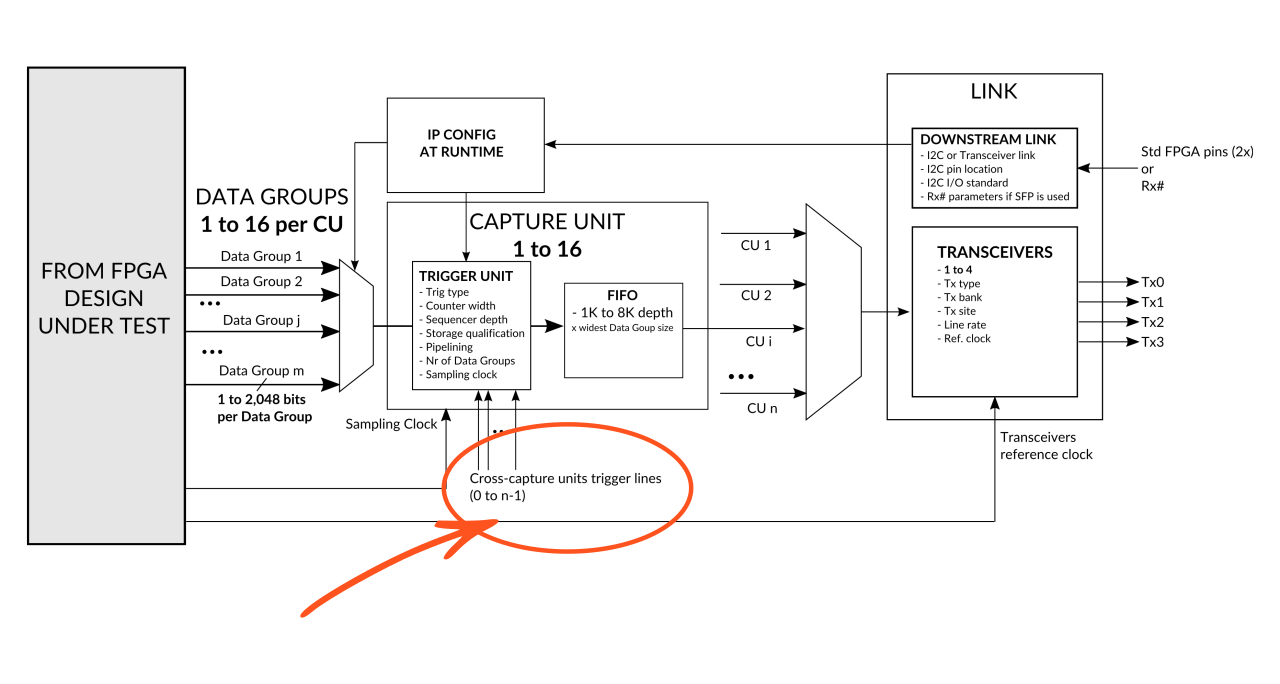
One unique feature of the capture units and trigger logic of Exostiv IP is a ‘cross clock domain’ triggering. This feature is available by default in all of our IPs, as we have foreseen a logic signal going from each capture unit to all the other ones. This path is used to ‘forward’ the trigger condition defined in one capture unit to all the others, so it can be combined locally to define a specific trigger. And… last but not least, this mechanism works no matter if the capture units are synchronous or not.
Usage scenario example
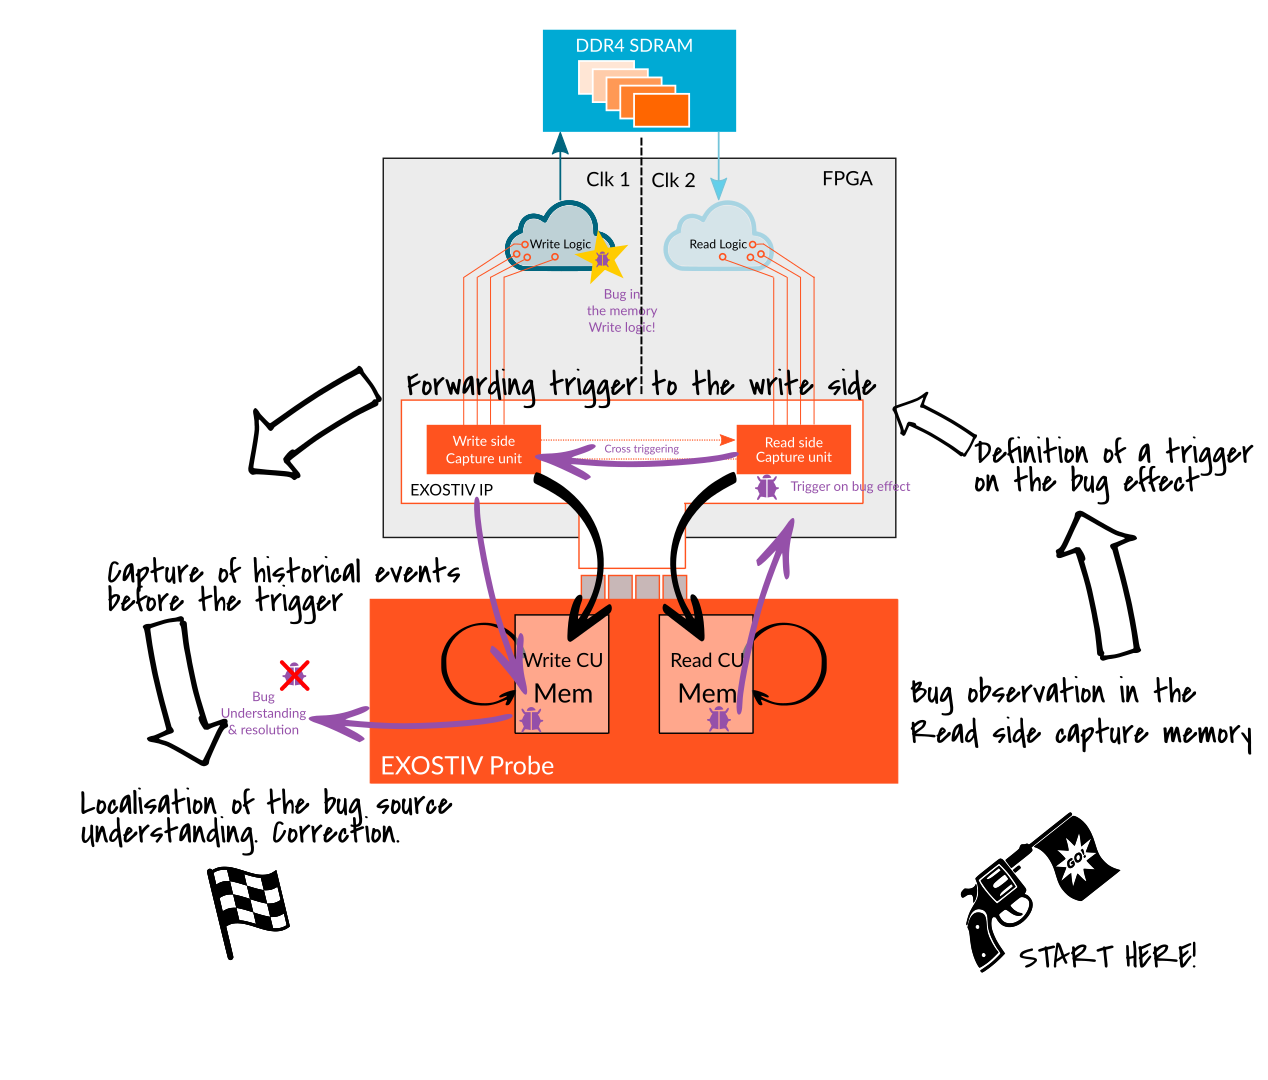
This feature proves to be useful when FPGA system uses an external DDR4 memory as a buffer in a continuous data flow, for instance (see figure below). It is very common that the data is processed before writing to the DDR4 and when it is read back too. This typically happens in video processing systems that use an external SDRAM as a frame buffer. This SDRAM can contain multiple frames – quite a lot of data. The multiport memory controller uses different clock frequencies at the ‘write side’ and the ‘read side’ of the memory. If a bug gets inserted suddenly at the write side, it is often detected only on the display, at the read side, quite a lot of time and data later.
(Click on the figure to enlarge.)
Typically, Exostiv can be used to:
- Observe the bug effect at the read side. Even if it is random, the potentially *very* large capture window of Exostiv allows to capture even 1 event in a lot of data.
- Place a trigger on the faulty data. It can be a condition on a value or a combination of values in the data payload for instance.
- Forward this trigger condition to the a capture unit placed in the ‘write side’ clock domain.
- Capture the history of events that happened *before* this event to roll back to the time when the faulty data was written. The huge trace storage of Exostiv combined with its ability to position the trigger event at the end of the capture window is key to being able to roll back *that much* in time.
- Observe the root cause of the bug and correct it.
In the example above, the cross-clock domain triggering coupled with the huge trace buffer (8GB) in the probe and the trigger positioning capability are instrumental to being able to find and correct the bug.
How does Exostiv manage cross clock domain crossing?
There are 2 cases:
- Case 1: the source clock domain and the destination clock domain use the same clock. In this case, the source trigger event is simply sent as a single pulse to the destination clock domain trigger machine and can be used synchronously.
- Case 2: the source clock domain and the destination clock domain use different clock frequencies. In that cae, the source trigger is sent as a ‘level’ to the destination clock domain. One this level is detected in the destination clock domain, it can be used locally. Of course, there is an uncertainty, since the event can only be used ‘as soon as it is really seen’ in the destination clock domain.

As always, thank you for reading.
– Frederic